潤稿:Gallant Chu - 密卡登遊戲
本文由David Arppe分享一些在遊戲中使用Raymarching技術的建議,也會介紹用在遊戲中的Raymarching程式碼,看看Raymarching這種舊的渲染技術如何用新的平行處理和計算技術進行優化!
Raymarching技術實際上已經“歷史悠久”,在很早之前就被用於一些“古老”而經典的遊戲中。例如下面兩款經典的“老”遊戲:
1.《Tennis for Two》

《Tennis for Two》被廣泛認為是最早的遊戲之一,它是一款使用示波器進行遊玩的遊戲!非常酷並且很有創意!由William Higinbotham在1958年推出。
2. 《Donkey Kong》

《Donkey Kong》是一款誕生於遊戲黃金年代的家機遊戲。遊戲主角是Jumperman(也就是現在的瑪利歐)。它被認為是首批帶有故事情節的遊戲之一,玩家在螢幕上可以像“看電影”一樣,驚恐地看著公主一次又一次被綁架。由Nintendo Research and Development 1在1981年推出。
這些老遊戲都非常有創意,他們突破了當時電腦硬體和軟體的限制使用了現在仍未過時的技術。
什麼是Raymarching技術
Raymarching是一種電腦圖形渲染方式,但它的潛力仍未被完全發掘。Raymarching一般用於渲染體積貼圖、高度圖以及解析曲面。如今,大多數遊戲用OpenGL或Direct3D(DirectX)來使用顯卡的硬體加速器繪製多邊形,電腦可以以每秒60幀的速度渲染幾百萬個三角面。雖然Raymarching沒有那些圖形API那麼出名,但它可以僅用兩個三角面實現無與倫比的細節。
RayMarching是一種數學渲染方式。它是由距離場(點到一個圖元的距離)、固定步長(通常用於體積渲染)和根定位(一個數學方法)完成的。
這個Demo可以按播放喔!
建立上圖這樣的場景需要借助建模工具(Maya, Blender, 3DsMax),繪圖工具(Photoshop, Gimp, MSPaint)。而該場景使用數學方法建立,透過Raymarching技術來渲染,不再受渲染三角面數的限制。不過,Raymarching技術並不是萬能的,它速度較慢,我認為它應該與多邊形渲染一起使用。
上圖並非是"影片",而是真的透過程式渲染出來的畫面,你可以點左上方的Snail來看到完整的程式碼。
如何在遊戲中加入Raymarching
結合Raymarching與多邊形兩種渲染方式並不難。不過首先要理解它們之間的區別:- Raymarching並非百分之百精確。而使用距離場可以趨近於希望渲染的表面,但幾乎無法得到真正想要的距離。
- 渲染多邊形(透視模式下)使用了投影矩陣。這是深度,不是距離。
這是一個在Unity裡寫的相機深度緩衝
float GetDistanceFromDepth(float2 uv, out float3 rayDir)
{
    // Bring UV coordinates to correct space, for matrix math below
    float2 p = uv * 2.0f - 1.0f; // from -1 to 1

    // Figure out the factor, to convert depth into distance.
    // This is the distance, from the cameras origin to the corresponding UV
    // coordinate on the near plane.
    float3 rd = mul(_invProjectionMat, float4(p, -1.0, 1.0)).xyz;

    // Let's create some variables here. _ProjectionParams y and z are Near and Far plane distances.
    float a = _ProjectionParams.z / (_ProjectionParams.z - _ProjectionParams.y);
    float b = _ProjectionParams.z * _ProjectionParams.y / (_ProjectionParams.y - _ProjectionParams.z);
    float z_buffer_value =  tex2D(_CameraDepthTexture, uv).r;

    // Z buffer valeus are distributed as follows:
    // z_buffer_value =  a + b / z
    // So, below is the inverse, to calculate the linearEyeDepth.
    float d = b / (z_buffer_value-a);

    // This function also returns the ray direction, used later (very important)
    rayDir = normalize(rd);

    return d;
}
當我使用投影矩陣的相反數來確定UV坐標(變換為[-1,-1]→[1,1])位於近平面(x,y,-1)。 在這一點上,我沒有使用視圖矩陣,所以假設相機是原點([0,0,0])。 該坐標的長度將隨著各種UV坐標而不同。 使用UV坐標[0.5,0.5],它應該與近平面距離相同。得到這些數字後,我設定了規範化的rayDir變數。 這個很重要。因為 Raymarching得透過Raycasting運作。
Raymarching的工作原理
在準備工作就緒後,獲得深度緩衝區裡的距離,就可以處理相交。透過逆投影矩陣計算出正確的射線,來匹配遊戲中攝影機的視角。然後定位攝影機即可。
fixed4 frag(v2f i) : SV_Target
{
float3 rayDirection;
// Our code from above!
float dist = GetDistanceFromDepth(i.uv.xy, rayDirection);
// The cameras position (worldspace)
float3 rayOrigin = _cameraPos;
// Accounting for the cameras rotation
rayDirection = mul(_cameraMat, float4(rayDirection, 0.0)).xyz;
//...
// more to come!
}
紫色的部分是特別標出的,我將距離存入浮點數,透過一個float3作為一個out變數,所以它會輸出一個正確的FOV,但也丟失了相機的旋轉資訊。我們可以使用一個標準的統一變數(_cameraPos)獲得這個位置。 將rayDirection與視圖矩陣相乘,用0.0作為w參數的原因是因為我們不希望存此變數中的攝像機位置,因為我們只會旋轉它。在Unity中的效果如下圖,兩個黃色球體與一個長方體相交。其中一個(右邊的)球體使用多邊形渲染。它按照預期與立方體相交。左邊的球體則按設置從遊戲攝影機中計算的正確FOV,位置和旋轉資訊。
另外請注意,與右側多面球體相比,用Raymarching渲染球體相交的立方體表面邊緣非常平滑。

渲染其他內容
使用Raymarching渲染需要較深的數學底子,或者用一些作弊的方法,就算是網路也沒太多資料可以找,這篇文章可以參考一下。http://iquilezles.org/www/articles/distfunctions/distfunctions.htmInigo Quilez - 一個真正的 raymarching 傳奇)
下面用球體以外的形狀來實現一些特殊物體!
float sdTorus( float3 p, float2 t )
{
  float2 q = float2(length(p.xz)-t.x,p.y);
  return length(q)-t.y;
}
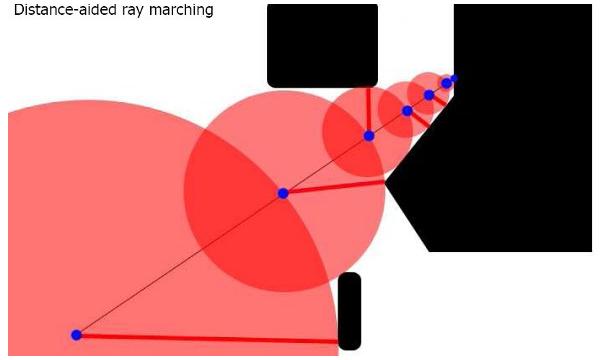
這是一個環面的距離公式。此距離函數回傳從點到距離圖元最近的點的距離,將用於渲染甜甜圈。在下圖中可以看到黑色圖形、紅圈、藍點及紅線。左下角的藍點是攝影機,右上角的藍點是正在觀察的點。除了知道與最近平面(底部中心粗短的黑線)的距離以外沒有任何資訊。因此,使用這個距離來向前移動。不斷重複這個過程,直到到達最終想要的平面!最後就可以得到目標平面的距離。

要實現甜甜圈,還需要實現以下功能:
獲取射線源(攝影機位置)獲取射線方向(攝影機FOV,長寬比還有旋轉角度)在函數中添加一個距離函數(環形)- 將光線投射到圖形上
- 在該光線上獲取到圖形表面的距離
下面,首先要計算一個點。使用標準的point-along-a-vector方程式,沿著所投射的射線移動一定的距離,然後計算到圖元的距離。將剛剛計算的數值加上沿射線移動的距離,然後重複該過程。透過FOR迴圈進行控制。
// Let's store the distance we're going to be calculating here
float d = 0.0f;
// We will step along the ray, 64 times. This value can be changed.
for (int i = 0; i < 64; i++)
{
// Here's where we calculate a position along our ray. with the very
// first iteration, it will be the same as just rayOrigin.
float3 pos = rayOrigin + rayDirection * d;
// This is the distance from our point, to the nearestPoint on the torus
float torusDistance = sdTorus(pos, float2(0.5, 0.25));
d += torusDistance;
}
//...
// more to come!
結果出來了,現在還只渲染出純黃色。到此已成功建立了一個環形,您也可以嘗試一些其它的距離函數,並觀察它們的工作工作原理。後面還會使用一些更高級的東西。

獲取G-Buffer資訊
還需要更多資訊來使用光照模型。現在,只有一條射線的距離。要在圖形上進行更多操作。需要知道:
- 3D座標
- 表面法線
還好這些屬性都非常容易獲得!
// This is pretty self explanatory. We have the distance. We just need to move that
// far down the ray to get the WorldSpace position
float3 pos = rayOrigin + rayDirection * d;
// What were doing here is, offsetting the position on the X axis, Y axis, and Z axis,
// and normalizing it to get an estimate of the surface normals
// Declaring eps as a float3, allows us to do some swizzle magic
float3 eps = float3( 0.0005, 0.0, 0.0 );
// This is ugly, but you can wrap it in a function. All distance functions create
// a distance field, which is usually in a function called 'map'
#define TORUS(p) sdTorus(p, float2(0.5, 0.25)).x
float3 nor = float3(
TORUS(pos+eps.xyy) - TORUS(pos-eps.xyy) ,
TORUS(pos+eps.yxy) - TORUS(pos-eps.yxy) ,
TORUS(pos+eps.yyx) - TORUS(pos-eps.yyx) );
#undef TORUS
nor = normalize(nor);
// The reason this works, is because we're normalizing the result. If the surface is
// up, the difference between the +Y and -Y sample will be larger than the differences
// between +X/-X and +Y/-Y. It all adds up to a really good estimate. For being very
// math-based, you're starting to see that raymarching is mostly estimates?
//...
// more to come
// more to come
結果得到一個有法線和世界座標的圓環,讓我們繼續做下去。

為了照亮它,我用了標準的Phong光照模型來幫圓環打光。
// Let's create some variables to work with
float3 l = normalize(sundir);
float3 e = normalize(rayOrigin); // with raymarching, eyePos is the rayOrigin
float3 r = normalize(-reflect(l,nor));
// The ambient term
float3 ambient = 0.3;
// The diffuse term
float3 diffuse = max(dot(nor,l), 0.0);
diffuse = clamp(diffuse, 0.0, 1.0);
// I have some hardcoded values here,
float3 specular = 0.04 * pow(max(dot(r,e),0.0),0.2);
specular = clamp(specular, 0.0, 1.0);
// Now, for the finished torus
float4 torusCol = float4(ambient + diffuse + specular, 1.0);
//...
// more to come!
看起來效果不錯,還缺少材質,可惜的是,也沒有辦法取得UV資訊,這部分我後面會解釋。

中場休息
在繼續說明之前,我想分享Shadertoy的另一個很酷的展示。 這也是一個可以互動的場景。 它具有折射,原始圖像和一些其他很酷的東西能和raymarching搭配使用。 陰影的半影效果基本上沒有任何消耗。 形狀的組合很容易實現(加,減,差)。 變形空間(扭曲,變形,彎曲)和實例也很簡單。這個Demo可以按播放喔!
投影映射
接下來幫甜甜圈上撒些東西!可以在這裡和這裡下載所用的貼圖。目標是盡可能地讓它看起來更像甜甜圈。
fixed4 frag(v2f i) : SV_Target
{
// ..
// All of the code we wrote is up here
// ..
// Sample the dough, from 2 planes. We're using the z and x normals
// to assure that we don't get any additive colors we don't want
doughnutColor = tex2D(_Dough, pos.xy - float2(0.5, 0.5)).rgb * abs(nor.z);
doughnutColor += tex2D(_Dough, pos.zy - float2(0.5, 0.5)).rgb * abs(nor.x);
// Using a top-down plane, sample from the sprinkles
// This should be a hard cutoff. So I will use an if statement
// Also, I am going to use some noise to get the 'drizzle' effect.
float noiseOffset = tex2D(_Noise, pos.xz * 0.2).x * 0.5f;
if (nor.y + noiseOffset > 0.7)
{
doughnutColor = tex2D(_Sprinkles, pos.xz).rgb;
} else {
doughnutColor += float3(1.0, 0.75, 0.5); // a color should work here
}
torusCol.rgb *= doughnutColor;
// AND FINALLY, remember how we calculated distance from the depth buffer?
// You can use your favorite depth-test mode right here.
return (dist < d ? tex2D(_MainTex, uv) : torusCol);
}
最終結果就會像這樣

參考資料:
Tennis for Two - https://commons.wikimedia.org/wiki/File:Tennis_For_Two_on_a_DuMont_Lab_Oscilloscope_Type_304-A.jpg
Donkey Kong - https://en.wikipedia.org/wiki/Donkey_Kong_(video_game)#/media/File:Donkey_Kong_Gameplay.png
#/media/File:Donkey_Kong_Gameplay.png)
Distance Based Raymarching - http://hugi.scene.org/online/hugi37/sphere_tracing.jpg
沒有留言:
張貼留言